Gameplay Basics
Overview
This page provides information for Shiren 2's various gameplay systems and mechanics.
Dungeon
Turns
Turns and Turn-Ending Actions
Being a turn-based roguelike, Shiren and monsters take turns when performing actions.
Generally, turn-ending actions include movement, attacking, using an item, and stepping in place.
Your turn does not end from idling, checking item details, or otherwise navigating menus.
The following actions are easy to forget / mistake:
- Equipping a weapon, shield, or bracelet does end the turn, but equipping a projectile does not.
- Talking to an ally character does not end the turn.
- Talking to a Shopkeeper or Trader does end the turn.
- Placing a trap on the ground does not end the turn.
- Failing to place an item on the ground does not end the turn.
- Successfully taking control of a monster using a Possession Staff does not end the turn.
- Cancelling a possession and returning to your body does not end the turn.
Turns Elapsing
Various effects or events occur based on the number of turns that have elapsed.
Try your best to not waste turns with meaningless actions.
- HP regenerates every turn at a rate of 0.5% of your max HP. (decimals accumulate)
- Fullness decreases by 1% every 10 turns.
- A new monster is generated every 50 turns.
- A Sheriff or Guard Dog is generated once per turn during Thief Mode.
- Wind sweeps you out of the dungeon when 2100 turns have elapsed.
Turn Processing Order
- Shiren's action
- Fire weakens
- Enemy movement
- Traps
- Fire damage (movement)
- Enemy attack
- Fire damage
- Turn End
Enemies standing on tiles that are on fire who received fire damage due to an action by Shiren
won't take additional fire damage on the same turn unless they move to a different tile that is on fire.
Characters other than Shiren with double or triple movement speed who received fire damage
by moving to a tile that is on fire will end their turn when they receive the fire damage.
Wind
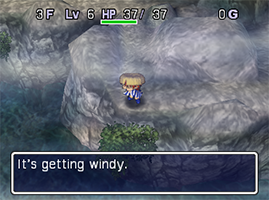
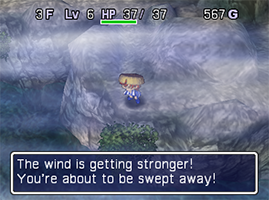
If you linger on the same floor inside a dungeon for a long time, a strong wind begins to blow.
(Also occurs inside the Training Hall and Napus Storage)
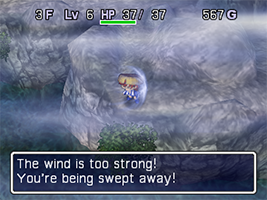
The gusts occur 3 times, and Shiren is swept back to Napus Village on the third gust of wind.
Being swept away by wind is equivalent to collapsing, so you'll lose all items and Gitan.
Asuka and Mamo's items will not be lost, and items on the floor inside Napus Storage will be safe.
- First gust of wind occurs on turn 1500
- Second gust of wind occurs on turn 1800
- Third gust of wind occurs on turn 2100
Recollections that play after resuming a suspended game will include wind in the playback,
so you can use that to check how many gusts of wind occurred.
Map Types
There are 2 map types for dungeons, which are called "Shuffle" and "Random".
Shuffle
- The map for the floor is randomly selected from a set of predefined patterns.
- The same pattern will never be repeated during an adventure.
- Boss floors such as Shuten Trail Hard 15F only have one pattern.
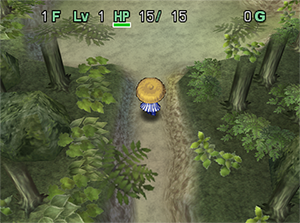
- The maps are generally very pretty, and have many fine details depicting nature.
- It's thought that Shiren 2 is among the most detailed games made for the Nintendo 64.
- Hallways and rooms vary in shape and feel more natural compared to lines
and rectangles seen elsewhere.
- Monster Houses and dungeon shops will never be generated. (Traders can still appear)
- Some item and monster special attack effects are nullified in this map type.
- Any effect that alters the shape of the map is nullified.
- (Pickaxe, Wonder Pick, Tunnel Staff, Great Hall Scroll, Rock Beast, Boulder Beast, explosions)
- Nothing happens to the water on the current floor when Evaporate or Freeze scrolls are read.
- Characters can't pass through walls. (Pumphantasm family, Typhoon, Phantasm Bracelet)
- Items with piercing properties still pierce through objects and walls. (Pierce Bracelet, etc.)
- Nothing happens if you step on a Flood Trap, and Pitfalls deal damage without changing floors.
- These traps are never generated in this map type, but can be brought in.
- Shuten Trail Mid 12F is the only exception, where falling into a Pitfall returns you to 11F.
- There's a glitch that hard-locks the game in Shuffle maps. →Glitches
- This map type is only used in Shuten Trails, boss floors, and Golden Intervals.
- In other words, Shuffle maps are rarely seen in post-game dungeons.
Dungeons:
- Small Valley
- Shuten Easy (1~4F, 7F, 9~10F)
- Shuten Mid (3~4F, 6~7F, 9~13F)
- Shuten Hard (1~2F, 10~15F)
- Golden Interval
- Onigashima (16F, 25F)
Random
- There are no predefined patterns, and each floor is generated completely randomly.
- Every tile is a ground, water, ice, wall, or unbreakable wall tile. (No air tiles)
- Rooms can have features such as water or ice, single column wall tiles spaced
throughout the room, item islands, maze-like terrain with a 1 tile field of view, etc.
- Rooms can have features such as water or ice, single column wall tiles spaced
- Waterways can be generated, which sometimes have a similar appearance to hallways.
- Monster Houses, dungeon shops, and Traders have a chance of being generated.
- Golden Stairs that lead to Golden Intervals can rarely be found hidden in a wall tile.
- All dungeons starting with Onigashima are Random maps, and have a limited field of view.
Dungeons:
- Shuten Easy (5~6F, 8F)
- Shuten Mid (1~2F, 5F, 8F)
- Shuten Hard (3~9F)
- Onigashima
- Shrine's Hidden Hole
- Halfway Well
- Sealed Room
- Road to the End
Field of View
- Shiren has a set distance he can see called field of view.
- The view radius is 1 tile in hallways, and the entire room + 1 tile along the edge in rooms.
- The location of items, monsters, and statues are visible on the map if Shiren can see them.
- Single room floors and some Shuffle maps don't differentiate between rooms and hallways,
and instead have a 5 tile field of view. (In other words, 11 tile radius) - It's possible to see past Shiren's field of view in Shuffle maps,
but not in darker dungeons such as Onigashima.
- Monsters also have their own field of view.
- They'll attack Shiren if he is visible, and will chase after him if they see him enter a hallway.
- They seem to detect Shiren from 2 tiles away in hallways, but won't use special attacks until adjacent.
- Monsters in a room will move toward Shiren if he is standing on a tile right outside the room.
- Monsters that can pass through walls can detect Shiren from anywhere on the current floor.
- Some monsters use special attacks toward Shiren or other monsters even if they aren't in view,
like Porky throwing stones at Shiren, or Bat Kangaroo swinging its staff at other monsters.
- Statues and items like scrolls that affect the entire room don't include the tile right outside the room.
- Except for Rock (castle material) items, which can hit monsters right outside the room.
Features
Shops
Shops are occasionally generated in Random type maps.
- Shops can be generated in Shuten Trail (Mid, Hard), Onigashima, Halfway Well, and Road to the End.
- However, shops will never be generated on Shuffle map floors.
- A maximum number of 2 shops can be generated on a floor.
- Items are placed in the center of the room as merchandise.
- There are typically 9 items in a shop, but smaller shops can have fewer items.
- Items for sale can include a N'dubba disguised as an item.
- Traps can be generated inside shops.
- Recommended to check for traps so you don't step on a Spring.
- There are either 1 or 2 entrances to a shop, and Shopkeepers always stands at the entrance.
- Items can't be placed on the ground where Shopkeepers stand, including the entrance.
- Droplet Ninja monsters will never place traps on a shop's entrance tile when defeated.
- The individual items for sale vary, and are based on each dungeon's item table.
- 2 types of shops can be generated - regular shops, and specialty shops.
- Specialty shops only sell 1 category of item, such as only grass items, or only bracelets.
- Shopkeepers block the exit when Shiren picks up merchandise, and ask for Gitan when you talk.
- Pay the amount of Gitan they ask for, and the item will become yours.
- Exiting the shop without paying for the item will trigger Thief Mode.
- For details about stealing, check out the Stealing Techniques page.
- If you want to sell items, simply place them on the ground.
- Shopkeepers will ask if you want to sell the items you placed when you talk to them,
so select [Yes] to sell the items.
- Shopkeepers will ask if you want to sell the items you placed when you talk to them,
- Shopkeepers fight back if attacked, but defeating a Shopkeeper will not trigger Thief Mode.
- They also attack monsters that deal damage to them, and level up when they defeat monsters.
- Merchandise can be refreshed by reading a Restock Scroll.
- All merchandise on the ground vanishes, and new items are generated in the center of the room.
- Merchandise in specialty shops will still be the same category of items.
- Restocking always generates 9 items (or fewer based on room size),
no matter how many items were on the ground.
Walls
Walls can be found in Random type maps.
They can be destroyed by Pickaxes, Tunnel Staff, monster special attacks, and explosions.
However, explosions that occur above water will not destroy walls.
Characters that can pass through walls:
- Cannot dig using Pickaxes while inside a wall, but Tunnel Staff can be used while inside a wall.
- Cannot throw items or roll Cannonballs while inside a wall.
- It's possible to throw items or roll Cannonballs if you have a Pierce Bracelet equipped.
- Characters that don't have the ability to wall-clip will warp elsewhere if they enter a wall.
- You still receive damage from explosions and Archdragon's fire breath inside walls.
- Items that arc can hit targets inside walls.
Unbreakable Walls
Unbreakable walls can be found in select Random type maps.
They cannot be destroyed by Pickaxes, Tunnel Staff, monster special attacks, or explosions.
The only way to destroy unbreakable walls is to read a Great Hall Scroll.
Characters that can pass through walls:
- Cannot enter unbreakable walls, even if they can wall-clip.
- Example: Shiren with a Phantasm Bracelet equipped.
- Cannot move through corners of unbreakable walls.
- It's possible to attack around corners of unbreakable walls.
- Typhoon and Asuka with a Phantasm Bracelet won't attack around corners.
Waterways
Waterways can be found in select Random and Shuffle type maps.
Unlike walls, you can move and attack through corners.
Items can fall in water, such as from stepping on a Trip Stone.
Submerged items cannot be picked up even with a Phantasm Bracelet equipped,
and magic bullets from staves will simply travel above the item.
Waterways can be turned into dry ground by reading an Evaporate or Great Hall scroll.
Frozen Floors
Frozen floors can be found in select Random type maps.
They can be generated naturally, or by reading a Freeze Scroll on a floor with waterways.
Characters will slide up to 4 tiles in a straight line when they move across frozen floors.
The sliding will stop if the character moves on top of an item or trap.
Disguised N'dubbas can be picked up as an item if Shiren was 2~4 tiles away before sliding to it.
Monsters that float can move across frozen floors without sliding.
Stairs cannot be moved onto frozen floors.
Frozen floor tiles will turn into regular ground tiles when a Great Hall Scroll is read.
Fire can be generated on top of frozen floors, and the frozen floor does not melt. (Example: Fire Staff)
Monsters that are frozen in ice cannot be damaged by fire.
Maze Rooms
Maze rooms can be found in select Random type maps.
The room resembles a maze and consists of branching hallways.
Shiren 2 doesn't generate floor-wide mazes, so maze rooms are usually rather small.
Items, traps, and stairs can be generated within the maze, unlike regular hallways.
Field of view is the same as hallways, and monsters can only detect Shiren if they are adjacent.
Treasure Rooms
Treasure rooms can be found in select Random type maps.
They are extremely rare, only having a 1% chance of being generated on certain types of floors.
These 4x4 rooms don't have an entrance or exit, and include 15 bags of 500 Gitan + 1 Spring.
You'll likely never enter one playing normally, and they can be tricky to find to begin with.
Locate them using a Scout Bracelet, or by using the Scout Bracelet-like effect of Monster Houses.
You'll need items like Great Hall Scroll, Tunnel Staff, Phantasm Bracelet, etc. to enter the room.
Random Map Patterns
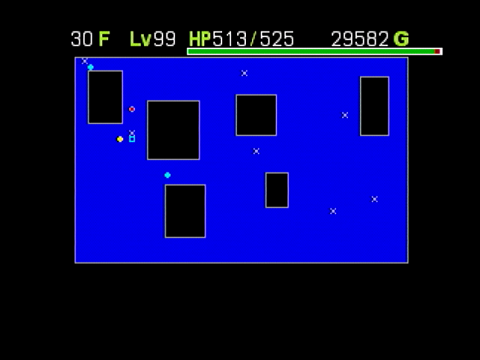
1 Large Room
The entire floor is 1 large room. Shops are never generated in this map type.
Rectangular walls or waterways are generated in the room.
Both Shiren and monsters have a field of view of 5 tiles. (11 tile radius)
Scrolls with effects that normally affect the entire room will only affect the field of view.
Statues will only affect tiles in a 11 tile radius, centered around the statue.
It can take a little while to find the stairs, thanks to the limited field of view.
iDash can be used to navigate to items or stairs without regard to the field of view,
but it's not recommended due to the risk of running into or getting surrounded by monsters.
Unlike other games in the series, this map type is not guaranteed to be a Monster House.
Underwater Houses will never be generated when walls are present.
Shiren 2 doesn't have regular Monster Houses in this map type.
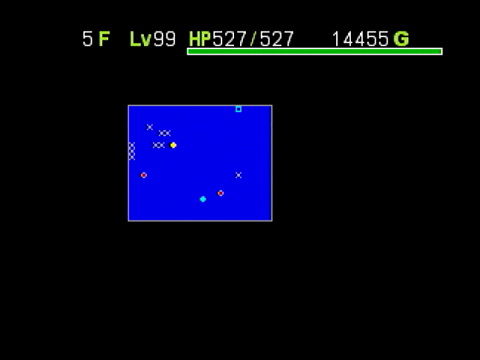
1 Medium Room
The entire floor is 1 medium sized room.
Walls and waterways are never generated, but statues can be present.
Like single large rooms, the field of view is limited to 5 tiles. (11 tile radius)
Due to the smaller size, this map type often ends up being more dangerous than
single large rooms, since there's a greater chance of encountering multiple monsters.
The outer wall can be broken using items like Tunnel Staff and Pickaxe,
so one strategy would be to create a tunnel and then swing a Fire Staff
or shoot Silver Arrows to clear out lines of enemies that follow you.
Unlike other games in the series, this map type is not guaranteed to be a Monster House.
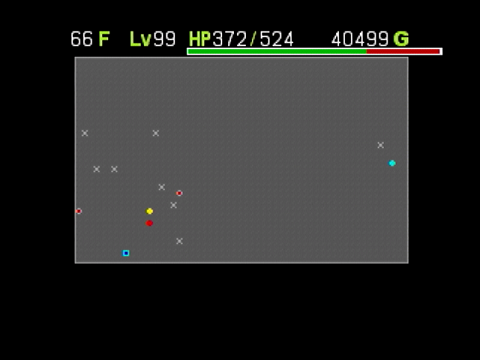
1 Large Frozen Room
The entire floor is 1 large room with frozen floors.
Monster Houses and shops will never be generated in this map pattern.
Walls and waterways are never generated, but statues can be present.
Like single large rooms, the field of view is limited to 5 tiles. (11 tile radius)
It's easy to get caught in traps on these floors due to all of the sliding on ice.
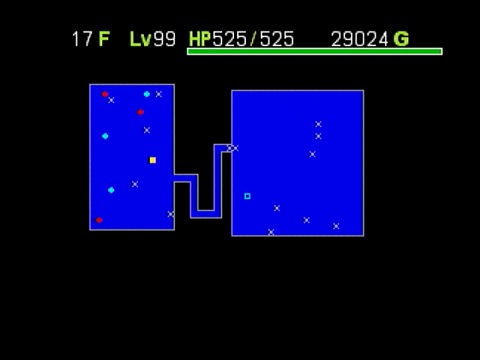
2 Rooms
The entire floor is 2 large rectangular rooms connected by a single hallway.
It's common for the hallway to have turns, rather than being a straight horizontal line.
Monster Houses are not guaranteed, and shops will never be generated.
The field of view is not limited, so scrolls and statues affect everything in the room.
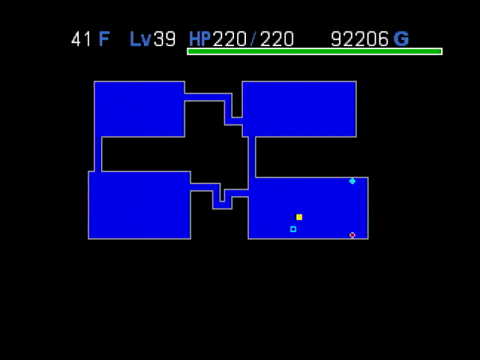
4 Rooms
Four rectangular rooms connected by hallways in a 2x2 layout.
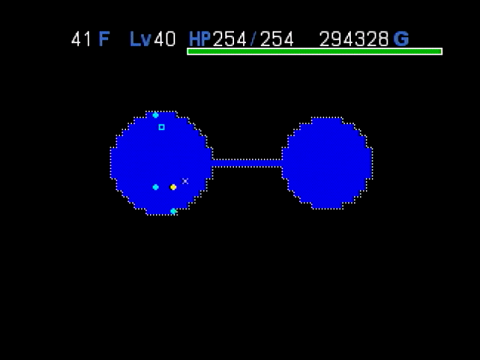
Monster Houses are not guaranteed, and shops will never be generated.2 Rooms (Dumbbell Shape)
The entire floor is 2 circular rooms connected by a single horizontal hallway.
Monster Houses and shops will never be generated.
Items and monsters are generated in the opposite room from where Shiren starts.
The start of the floor is safe, but monsters quickly flow in from the opposite room.
Items like Fire Staff and Silver Arrows can make quick work of monsters.
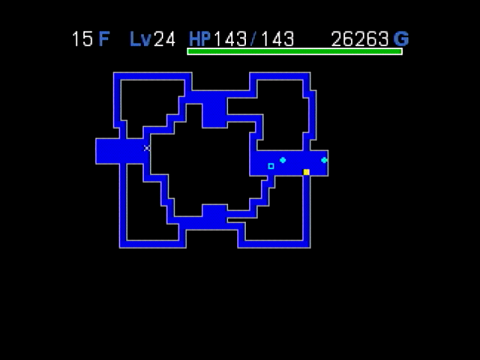
4 Rooms (2 Hallways)
The entire floor is 4 rooms placed in cardinal directions connected by 2 hallways.
Shops will never be generated in this map pattern.
Each room has four entrances, and each set of two hallways leads to the next room.
It's more efficient in terms of number of turns and fullness depletion to explore
the floor using the inner hallways rather than the outer hallways.
8 Rooms
The entire floor is 8 rooms in a 4x2 layout, with one hallway going around the outside.
It's best to explore the floor using the inner hallways when possible, since monsters
tend to end up circling the floor in the outer hallway.
Unlike previous games, this map type doesn't have a greater chance of generating shops.
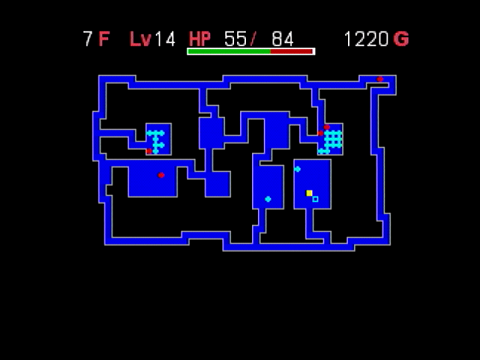
12 Rooms
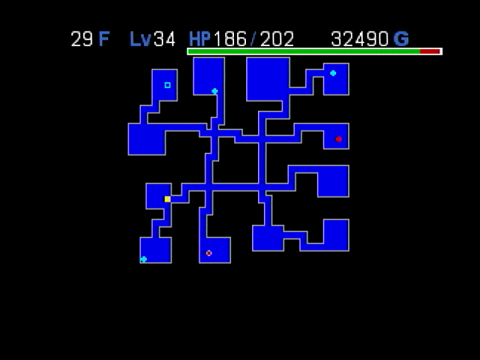
The entire floor is a hallway grid layout with a total of 12 rooms placed on the end points.
It can take quite a few turns to explore the floor due to the number of rooms,
combined with having to return to the hallways after checking each end point.
Consider using a Pickaxe or Tunnel Staff to create shortcuts between rooms.
Unlike previous games, this map type doesn't have a greater chance of generating shops.
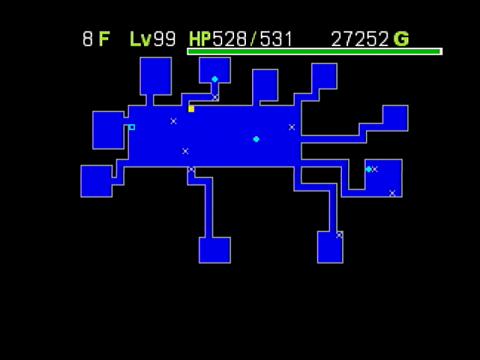
1 Medium Room + Small Rooms (Octopus Shape)
The entire floor is 1 medium sized room with individual hallways leading to single rooms.
Also called "Crab Shape", "Sun Shape", "Radial Shape", and "Octopus Shape".
Expect to encounter many monsters due to having to return to the center after checking each room.
Be careful not to get surrounded at the start, since monsters will quickly flow into the center room.
Particularly tricky when monsters with ranged attacks are present, such as Sky Dragon.
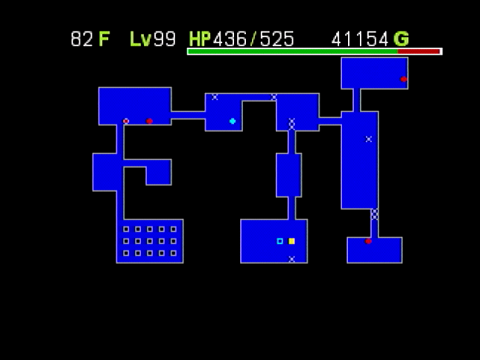
Single Branched Rooms
The entire floor consists of rooms connected by 1 hallway between each room.
(The number of hallways = number of rooms - 1).
Each branch eventually leads to a room as a dead end, so it's common to encounter monsters.
On rare occasions, hallways can end up looping or having branches (such as a cross-shape).
One of the most common patterns, with Road to the End having 30 floors of this or Single Path.
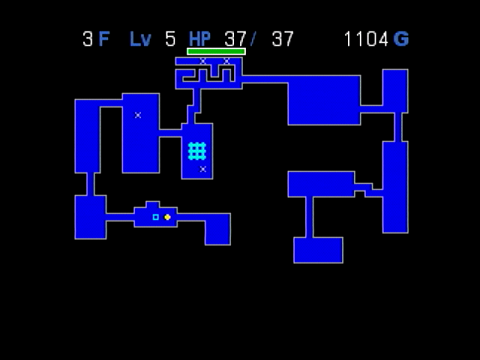
Single Path
The entire floor consists of a single path between rooms without any branching hallways.
(The number of hallways = number of rooms - 1).
Expect to encounter every monster on the floor, often having to fight multiple in a row.
Map Images source: 風来のシレン2 鬼襲来!シレン城! 攻略Wiki
Item / Character Limits
There's a maximum number of items and characters that can be present on a floor.
Item limit
- The max number of items (including both inventory and the ground) is 160, including traps.
- Monsters will no longer drop new items or traps when the number of items is at the limit.
- Actions that increase the number of items are nullified.
- Shooting an arrow from a stack would add 1 item. (99 arrows → 98 + 1)
- Some monsters like Bow Boy won't be able to use their special attack.
- A monster inside a Monster Pot is counted as 1 item, so you can't capture monsters.
- Ally monsters can't return to their pot if the item limit is reached while they're out.
- Items on the ground inside Napus Storage will begin to vanish if there are 161 or more items
between your inventory and the number of items on the ground.
16BGLQV  If there are 161 items,
27CHMRW  the item at position 1 will vanish,
38DINSX  and if there are 170 items,
49EJOTY  items at positions 1~A will vanish.
5AFKPUZ
Character Limit
- The max number of characters is 30.
- Includes Shiren, monsters, allies, NPCs, statues, decoys, and figures.
- Monsters stop spawning, and Shadow Scroll and Soil won't generate shadows or figures.
- Ally monsters can't be sent out of their pots when the character limit is reached.
Score (Leaderboards)
Score is calculated when you either clear a dungeon, or collapse and return from a dungeon.
The leaderboard keeps track of 30 placements per dungeon.
Score Formula
- The dungeon must be cleared for selling price of items and clear bonus to apply.
Score = (Floor - 1) * 5000 + (Gitan) + (selling price of items) + (clear bonus)
Clear Bonus
- Shuten Trails, Onigashima, Road to the End = 5,000.
- Sealed Room = 450,000.
- You can't obtain the clear bonus once all 5 children have been rescued.
- The floor number you rescue a child on does not affect the clear bonus.
- Floor = 20 in the score formula when Sealed Room is cleared.
- Halfway Well = 500,000.
- Floor = 10 in the score formula when Halfway Well is cleared.
Item
Synthesis
Synthesis is a mechanic that lets you modify one item using another item.
- The item to be modified is called the base, and the secondary item is called the ingredient.
- In a broad sense, the base can also be considered an ingredient.
- The first item inserted into a Synthesis Pot or thrown at a Mixer becomes the base,
and items inserted or thrown afterward are the ingredients. - Generally, the item used as a base will not be lost or transformed.
- However, items used as ingredients will be consumed and lost.
- Weapons, shields, and staves are the three item categories that can act as a base.
- Ingredients must be the same category as the base item when using a Synthesis Pot.
Staff Synthesis
Only staves with identical names can be synthesized together.
Synthesizing staves will add the number of uses together, and will also identify the staff.
Weapon, Shield Synthesis
- Synthesize weapons with weapons, or shields with shields.
- Upgrade value and special abilities will be added / transferred to the base item.
- Special abilities on equipment are called seals in Shiren 2.
- Seals are depicted as a single Japanese character.
- Upgrade value is the + or - number after the item's name, such as Katana+1.
- The max upgrade value for all weapons and shields is +99.
- Weapons and shields have a limited number of seal slots.
- Unlike other games, you cannot fit every seal in the game into one weapon or shield.
- Each weapon or shield has a set number of slots, but the number of slots can be increased.
- The max number of slots is 16.
- Plating (金) and curse (呪) are counted as seals in Shiren 2.
- Effects can stack when the same seal is synthesized multiple times.
- Example: 1 弟 seal restores 4 HP, 2 弟 seals restores 7 HP, and so on.
- Some two-handed weapons and shields can only be used as a base in synthesis.
Things that affect seals:
- Synthesis Pot
- Plating Scroll
- Purify Scroll
- Mixer monsters
- Straw Voodoll monsters
- Monsoon Doll
- Gyandora
- Blacksmith (Shuten Halfway)
- 帰 seal
Things that affect seal slots:
- Blank Scroll
- Mixer monsters
- Gyandora
Mixer Synthesis
- Synthesize different category items when a weapon or shield is used as a base.
- Example: Grasses, scrolls, etc.
- Different category items can only be synthesized by throwing items at a Mixer monster.
- To be clear, you cannot synthesize different category items using a Synthesis Pot.
List of ingredients and resulting seals:
(See Seals for details)
- Dragon Grass (火)
- Flame Grass (火)
- Otogiriso (弟)
- Herb (薬)
- Life Grass (命)
- Antidote Grass (消 - shield only)
- Strength Grass (ち - weapon only)
- Happy Grass (幸)
- Angel Seed (天)
- Unlucky Seed (不, 呪)
- Disaster Seed (超, 呪)
- Slumber Scroll (眠)
- Purify Scroll (祓)
- Identify Scroll (識)
- Retreat Scroll (帰)
- Blank Scroll (seal slot +1)
- Onigiri (飯)
- Large Onigiri (飯)
- Huge Onigiri (飯)
- Special Onigiri (飯)
- Silver Arrow (銀)
- Dragon Tile Bracelet (中)
Seal Order
- Seals will be added in the same order as the order of ingredients.
- If an ingredient has an innate seal, that seal will be added before the other seals.
- Example 1: Katana (三回○○○), then Drain Buster+2 (目○○○○) = Katana+2 (三回ド目○)
- Example 2: Katana (三回○○○), then Drain Buster+2 (目竜月火○) = Katana+2 (三回ド目竜)
- The (月火) are lost because the number of seals exceeds the number of slots.
- So remember, seals are added from the left, and innate seals are added before others.
- Example 3: Katana+2 (三回ド目○), then Homing Blade-1 (呪○○) = Katana+1 (三回ド目必)
- Homing Blade's innate seal (必) was added first, so the curse (呪) didn't transfer.
- The + and - values were added together, resulting in -1 upgrade value.
- Nice if you find cursed equipment and want to add the innate seal but not the curse.
- Example 4: Katana+7 (三回ド目必), then Disposable Sword+3 (○○○) = Katana+10 (三回ド目必)
- Disposable Sword's innate seal (捨) was not transferred, because the Katana's slots were full.
- So as long as the base equipment's slots are filled, you can add upgrade values
without adding undesirable seals.
Special Synthesis
- If you synthesize specific seals onto certain pieces of equipment, the item turns into a new item.
- Think of these as secret recipes to create powerful equipment.
- Check the the item and seal pages for details regarding the mentioned items.
- Special synthesis recipes are also listed in the item pages.
Weapons:
- Kaburasutegi
- Daisangen Sword
- Fiery Fuuma
- Healing Sword
- Wonder Pickaxe
- Ryujin Sword
Shields:
- Helix Shield
- Daisangen Shield
- Nirvana Shield
Durability
Weapon Durability
All weapons are assigned a random durability value between 15~60.
When synthesizing weapons, the durability of the base weapon is unchanged.
Digging using a Pickaxe's ability or destroying traps using a Mallet's ability lowers durability by 1,
and the weapon breaks once durability reaches 0.
Bracelet Durability
Bracelets can sometimes crack when you receive damage while they're equipped.
The purchasing and selling price of a cracked bracelet remains the same.
The chance for a bracelet to crack is ~3%, except for Trapper Bracelet which has a ~10% chance.
Bracelets other than Trapper Bracelet have a ~9% chance to crack from explosions.
Once a bracelet cracks, a durability value of 5~15 is set, and the bracelet shatters once it reaches 0.
Durability decreases by 1 when you're hit by an attack in the "Actions that can crack or shatter" list below.
So basically:
- Cracks are based on luck, and can occur as early as the first hit after equipping a bracelet.
- Cracked bracelets will never immediately shatter, but will after a little while of receiving attacks.
- This applies to bracelets equipped by Asuka as well.
Actions that can crack or shatter:
- Monster direct attacks.
- Brutal hits from Taur monsters.
- Ouch Statue's attacks.
Actions that can crack:
- Body slams by Stone Beast monsters. (?)
- Tripping. (Trip Stone, Armordillo monsters, Balance Staff)
- Explosions. (Cannonballs, landmines, Patient Bag, Bomber and Explosion statues)
- Log, Burr, Rockfall, and Rockslide traps.
Actions that never crack or shatter:
- Getting hit by arrows, stones, or other thrown items.
- Special attacks or traps that don't deal damage. (Example: Inflict a status condition)
- Getting sprayed by water from a Shotfish monster.
- Fire or ice breath attacks.
- Non-physical ranged attacks. (Example: Staff magic)
- Droplet or Flood traps.
So, there's no need to unequip bracelets when you're fighting Bow Boy or Boy Cart.
They also don't need to be unequipped when being hit by Archdragon or Porkon special attacks.
If your bracelets are already cracked, they don't need to be unequipped when fighting Cranky Tank.
Fire Pillars
Fire pillars are generated by Fire Staff, Blaze Scroll, and one of Boss Oni's special attacks.
Characters standing on tiles with fire pillars will receive 20 damage. (Tiny Phoenix is immune)
Fire damage is reduced to 10 points if a 10 Damage Statue is present.
Items and statues burn up and vanish when fire pillars are generated on the same tile.
They can be generated on top of frozen floors, and will not melt the ice.
Monsters frozen in ice will not receive fire damage, and fire pillars cannot
be generated on tiles with stairs, traps, or waterways.
The fire will be extinguished if a trap is placed on the ground where a fire pillar is burning,
water from a Water Pot is poured on the fire, or if an Aqua Dragon monster's frozen breath
attack collides with a fire pillar.
Thrown items burn up before they have a chance to hit a character standing in fire.
However, traps and items with piercing properties can pass through the fire,
along with items that arc such as Porky Stones.
Fire damage is inflicted every time a character moves over a burning tile.
For example, you can deal multiple fire damage hits in a single turn by swinging a
Knockback Staff at an enemy, sending them flying through multiple fire pillars.
Fire damage will be weakened to 10 damage after Shiren performs 8 actions,
followed by 5 damage on the next turn, and will finally disappear altogether on turn 10.
The duration of a fire pillar can be extended by burning items, or if the fire defeats a character.
Characters other than Shiren can generate fire pillars, such as a Bored Kappa monster
throwing a Fire Staff, or a Tonosamadon reflecting a Fire Staff back at Shiren.
If this happens, the monster will level up when a character is defeated by fire damage.
Shiren's HP is not restored by 薬 or 弟 seals when he receives damage from a fire pillar,
except for the very first fire pillar generated when hit by a Fire Staff.
The 薬 and 弟 seals never restore HP when you take fire damage from pillars created by Boss Oni.
Ally Items
Asuka's equipment and items stored in Mamo's drawers persist between adventures,
and they both drop their items if they collapse inside a dungeon.
However, there are a few cases where Asuka and Mamo's items will vanish:
- Selecting [Return to Napus Village] from the main menu.
- Copying a journal. (Asuka and Mamo's items will vanish in the copy)
- Certain in-game events.
It's best to store important items in Napus Storage, rather than having Asuka or Mamo carry them.
Status
Level / Growth
Shiren, Ally Level
Shiren and his allies start at level 1, and level up after gaining a certain amount of experience points.
They can reach a max level of 99, but their level resets each time they start a new adventure.
Some items and monsters have the ability to decrease level, and the minimum level is 1.
Leveling up raises max HP and base attack, and HP is healed equal to the amount of max HP you gained.
Allies also gain an increase in defense when they level up.
Shiren and his allies gain experience points at the same rate.
However, some items that modify level have different effects between Shiren and ally characters.
For example, swinging a Happy Staff at Shiren provides 500 experience points,
and swinging it at an ally will simply level them up.
See the Exp & Stats page for details on level up stats and required amount of experience points.
Enemy Monster Level
Monsters level up and turn into a higher rank monster if they defeat other monsters or Shiren's allies.
Monsters can also level up from items such as Happy Staff, Happy Grass, Angel Seed.
Ally Monster Growth
Ally monsters don't have experience points or level ups, but instead have what's called growth.
Growth occurs when an ally monster defeats an enemy monster, increasing both max HP and strength.
Every monster has a set growth limit, and the stat gains per growth differs between monsters.
Ally monsters will keep their growth between adventures, but growth will be halved if they are defeated.
(Growth is only halved for monsters registered to Monster Kingdom, since unregistered monsters are lost)
Things that affect Level and Growth
See the item, monster, seal, and secret phrase pages for details.
Items:
- Happy Grass
- Angel Seed
- Twisty Grass
- Unlucky Seed
- Disaster Seed
- Spoiled Onigiri
- Happy Staff
- Unlucky Staff
- Happy Shield
- Level Lock Bracelet
Monsters:
- Twisty Hani
- Gazelle Pope
- Mr. Helico (Happy Grass)
Other:
- Synthesis seals (幸, 天, 超)
- Secret phrases (DOJO, ZENKAI)
HP
Shiren, Ally HP
Shiren always begins with 15 HP at the start of an adventure, and max HP never falls below 15.
Max HP increases with each level up, and items can also be used to increase max HP. (Max: 999)
Max HP decreases if Shiren loses levels due to monster special attacks or item effects.
Mamo starts with 100 HP, but it doesn't have the ability to gain levels.
HP regenerates at a rate equal to 0.5% of max HP per turn.
Decimals accumulate, and will be reflected in the remaining HP once the value reaches 1.
Some HP is restored after receiving an attack if you have 薬 or 弟 seals synthesized onto your shield,
but the HP restoration occurs after the HP loss, so if the amount of damage surpasses
the amount of remaining HP, you'll collapse before the HP restoration occurs.
Monster HP
Ally monster Max HP increases when they grow stronger, and items like Life Grass
can be used to increase max HP for both ally and enemy monsters. (Max: 9999)
However, max HP increases from sources other than growth are temporary,
and will reset when the ally monster returns to its pot.
Monsters don't regenerate HP, but ally monsters will be fully healed when they return to their pot.
Things that affect HP
The following list excludes things that only deal damage or modify level.
See the item, monster, seal, trap, and secret phrase pages for details.
Items:
- Herb
- Otogiriso
- Life Grass
- Revival Grass
- Water (castle material)
- Poison Grass
- Special Onigiri
- Spoiled Onigiri
- Heal Staff
- Quarter Staff
- Healing Sword
- Heal Bracelet
Monsters:
- Evil Kangaroo
- Emperor Tusker
- Tiny Phoenix
- Goat Pastor
Other:
- Synthesis seals (薬, 弟, 回)
- Starvation
- Landmine
- Big Landmine
- Flood Trap
- Secret phrases (REEVA, JAGUAR)
Strength
Shiren, Ally Strength
Shiren starts each adventure with 8 strength, and can increase max strength up to 99.
Some items and monster special attacks lower strength, down to a minimum value of 1.
Strength is twice as potent as weapon strength in calculating attack for Shiren and his allies,
but it can only be increased through the use of specific items.
Level ups and strength both factor into attack calculation, but if choosing to spend time
increasing one or the other, strength should be prioritized since the attack increase is immediate
and can be felt
throughout the entire adventure, whereas level ups occur naturally as you progress
through the dungeon either way, and slow down the further you progress.
Being revived by Revival Grass will restore strength, similar to eating Antidote Grass.
Things that affect strength
See the item, monster, seal, trap, and secret phrase pages for details.
Items:
- Strength Grass
- Antidote Grass
- Revival Grass
- Poison Grass
- Special Onigiri
- Spoiled Onigiri
- Scale Shield
- Strength Bracelet
- Salty Bracelet
Monsters:
- Sluggy family
- Scorpion
- Sheep Priest
- Mr. Drone (Strength Grass)
Other:
- Synthesis seals (う, 消)
- Poison Trap
- Secret phrases (ASUKA, KENZAN)
Monster Strength (Attack)
For monsters, attack = strength + 1.
Attack ranges from 1~9999, except for Froggos and Zaloklefts, which have 0 attack. (-1 strength)
Mixer monsters can increase their attack beyond 9999 by swallowing items.
Things that modify enemy and ally monster attack
Ally monster strength will be reset when they return to their pot.
- Sheep Priest spell = x0.5 (25 turns)
- Scorpion sting = x0.5
- Water Pot = x0.5 (Monsters with weapons only)
- Venom Sluggy lick = x0.6
- Poison Grass = x0.6
- Rancor Sluggy lick = x0.7
- Bitter Sluggy lick = x0.8
- Sluggy lick = x0.9
- Poison Trap = Strength set to 0
- Strength Grass = Strength +1
Lowering effects stack, and lost strength can be restored using Antidote Grass.
However, Sheep Priest's spell does not stack, and cannot be canceled by Antidote Grass.
Poison Trap lowers strength by 50% if under the effect of Sheep Priest's spell.
Fullness
Shiren's fullness starts at 100%/100% when he enters a dungeon.
Max fullness can be increased up to 200%, and decreased down to the minimum value of 0%.
Shiren's fullness decreases by 1% every 10 turns. (So 100% is equal to 1000 turns)
If a Leather Shield is equipped, Shiren's hunger rate will be halved. (1% every 20 turns)
Once fullness reaches 0, Shiren will be inflicted with the Starvation special condition.
The UI darkens, natural HP regeneration stops, and Shiren loses 1 HP every turn.
iDash and stepping in place are both disabled so that you don't accidentally collapse missed inputs.
Things that affect Fullness
See the item, monster, seal, trap, statue, and secret phrase pages for details.
General:
- Eating any grass item replenishes 5% fullness.
- Being revived by Revival Grass replenishes fullness to max.
- Possessing a Hunger Puppet monster and using its special at a monster replenishes some fullness.
Items:
- Onigiri
- Squid Sushi Scroll
- Shrink Seed
- Expand Seed
- Other grass items
- Perfect Water
- Dried Bonito
- Gobo
- Leather Shield
- Heavy Shield
- Nirvana Shield
- Song Bracelet
- Hunger Bracelet
- No Hunger Bracelet
- Heal Bracelet
- Onigiri Sword (Makes Onigiri)
Monsters:
- Hunger Puppet family
- Nigiri Morph, Nigiri Master (Makes Onigiri)
Other:
- Synthesis seals (皮, 重, サ, か, 食, 飯)
- Spoil Trap (Makes Onigiri go bad)
- Onigiri Statue (Makes Onigiri)
- Starvation
- Secret phrase (BUFU)
Combat
Attack
This section takes all stats into account when defining attack, rather than just weapon strength.
If the target has 0 defense, the amount of damage dealt will be the attack value + variance.
Base Attack
Base attack is based on a character's level, and is separate from strength and weapon strength.
This stat is not 1:1 with the character's current level, but instead has an assigned value per level.
See the Exp & Stats page for base attack values per character.
Attack Calculation
Monsters simply have an attack value of strength + 1.
Shiren and his allies use the following formula:
Attack = int((int(weapon strength / 2) + strength + 8) * base attack / 16)
Thrown items and projectiles have a strength value, which is treated as weapon strength.
Defense
This section considers shield strength and base defense as separate stats.
Shiren, Ally Defense
Shiren has 0 base defense without a shield equipped, and Mamo has a base defense of 20.
Other allies have slightly varying base defense, which increases with level ups.
Allies will never have their defense lowered by anything except leveling down.
If Shiren or Asuka has a shield equipped, shield strength / 2 is added to their base defense.
See the Exp & Stats page for base defense values per character.
Monster Defense
Monsters have predefined base defense values, which never increase based on growth.
Monsters have their defense halved when attacked by other monsters.
Things that lower Monster Defense
- Rust Trap = Defense set to 0
- Stormy Doll rain = Defense set to 0
- Rainy Doll rain = x0.65
Damage Calculation
Damage is roughly calculated using the following formula:
Average damage = attack * ((35/36)^defense)
Max damage = average damage + (average damage/8)
Min damage = average damage - (average damage/8)
Damage received based on defense:
| Def | Shield | Damage (%) | Def | Shield | Damage (%) | |
|---|---|---|---|---|---|---|
| 1 | 2 | 97.2 | 56 | 112 | 20.6 | |
| 2 | 4 | 94.5 | 57 | 114 | 20.0 | |
| 3 | 6 | 91.9 | 58 | 116 | 19.5 | |
| 4 | 8 | 89.4 | 59 | 118 | 19.0 | |
| 5 | 10 | 86.9 | 60 | 120 | 18.4 | |
| 6 | 12 | 84.5 | 61 | 122 | 17.9 | |
| 7 | 14 | 82.1 | 62 | 124 | 17.4 | |
| 8 | 16 | 79.9 | 63 | 126 | 16.9 | |
| 9 | 18 | 77.6 | 64 | 128 | 16.5 | |
| 10 | 20 | 75.4 | 65 | 130 | 16.0 | |
| 11 | 22 | 73.4 | 66 | 132 | 15.6 | |
| 12 | 24 | 71.3 | 67 | 134 | 15.1 | |
| 13 | 26 | 69.4 | 68 | 136 | 14.7 | |
| 14 | 28 | 67.4 | 69 | 138 | 14.3 | |
| 15 | 30 | 65.6 | 70 | 140 | 13.9 | |
| 16 | 32 | 63.7 | 71 | 142 | 13.5 | |
| 17 | 34 | 61.9 | 72 | 144 | 13.2 | |
| 18 | 36 | 60.2 | 73 | 146 | 12.8 | |
| 19 | 38 | 58.5 | 74 | 148 | 12.4 | |
| 20 | 40 | 56.9 | 75 | 150 | 12.1 | |
| 21 | 42 | 55.3 | 76 | 152 | 11.7 | |
| 22 | 44 | 53.8 | 77 | 154 | 11.4 | |
| 23 | 46 | 52.3 | 78 | 156 | 11.1 | |
| 24 | 48 | 50.9 | 79 | 158 | 10.8 | |
| 25 | 50 | 49.5 | 80 | 160 | 10.5 | |
| 26 | 52 | 48.1 | 81 | 162 | 10.2 | |
| 27 | 54 | 46.7 | 82 | 164 | 9.9 | |
| 28 | 56 | 45.5 | 83 | 166 | 9.6 | |
| 29 | 58 | 44.2 | 84 | 168 | 9.4 | |
| 30 | 60 | 43.0 | 85 | 170 | 9.1 | |
| 31 | 62 | 41.7 | 86 | 172 | 8.8 | |
| 32 | 64 | 40.6 | 87 | 174 | 8.6 | |
| 33 | 66 | 39.5 | 88 | 176 | 8.4 | |
| 34 | 68 | 38.4 | 89 | 178 | 8.1 | |
| 35 | 70 | 37.3 | 90 | 180 | 7.9 | |
| 36 | 72 | 36.3 | 91 | 182 | 7.7 | |
| 37 | 74 | 35.2 | 92 | 184 | 7.5 | |
| 38 | 76 | 34.3 | 93 | 186 | 7.2 | |
| 39 | 78 | 33.3 | 94 | 188 | 7.1 | |
| 40 | 80 | 32.4 | 95 | 190 | 6.9 | |
| 41 | 82 | 31.5 | 96 | 192 | 6.7 | |
| 42 | 84 | 30.6 | 97 | 194 | 6.5 | |
| 43 | 86 | 29.8 | 98 | 196 | 6.3 | |
| 44 | 88 | 28.9 | 99 | 198 | 6.1 | |
| 45 | 90 | 28.1 | 100 | 200 | 6.0 | |
| 46 | 92 | 27.3 | 101 | 202 | 5.8 | |
| 47 | 94 | 26.6 | 102 | 204 | 5.6 | |
| 48 | 96 | 25.9 | 103 | 206 | 5.5 | |
| 49 | 98 | 25.1 | 104 | 208 | 5.3 | |
| 50 | 100 | 24.5 | 105 | 210 | 5.2 | |
| 51 | 102 | 23.8 | 106 | 212 | 5.0 | |
| 52 | 104 | 23.1 | 107 | 214 | 4.9 | |
| 53 | 106 | 22.4 | 108 | 216 | 4.7 | |
| 54 | 108 | 21.8 | 109 | 218 | 4.6 | |
| 55 | 110 | 21.2 | 110 | 220 | 4.5 |
Accuracy
Shiren's Accuracy
- Direct Attack: 1872 / 2000 = 93.6%... 15/16 or so?
- Projectile: (Not researched)
Monster Accuracy
- Direct Attack: 13136 / 15000 = 87.6%... 7/8
- Projectile: (Not researched)
Accuracy Modifiers
100% Accuracy:
- Direct attacks with a Homing Blade (必 seal) equipped.
- Direct attacks against a paralyzed or sleeping target.
- Shooting a projectile or throwing an item with a Bullseye Bracelet equipped.
0% Accuracy:
- Monster direct attacks while afflicted with the Miss status condition.
- Direct attacks against a target that has a shield with 16 見 seals + 1 Paper Thin Bracelet equipped.
- Shooting a projectile or throwing an item with a Dragon Tile Bracelet equipped.
Other:
- Direct attacks against a target that has an Evasive Shield (見 seals) equipped.
- Direct attacks against a target with Paper Thin Bracelets equipped. (1 = 50%, 2 = 25%)
- Direct attacks by Shiren or allies while afflicted with the Miss status condition. (50%)
- Homing Blade (必 seal)'s effect is nullified while afflicted with the Miss status condition.
Critical Hits・Brutal Hits
Critical hits are determined after accuracy is checked, so they aren't a factor for accuracy.
However, brutal hits are determined prior to the accuracy check, and are guaranteed to connect.
So Taur monsters effectively have higher accuracy than other monsters:
Brutal hit chance = 0.25
Regular attack accuracy = 0.875
Accuracy = 0.25 + 0.75 * 0.875 = 0.90625
Facilities
Storage
Storage located in Napus Village.
You can deposit up to 60 items, and up to 35 items can be placed on the floor.
However, items inside pots will vanish, and the size of the pot will not be restored.
Traps can be collected using a Trapper Bracelet, and can then be deposited like other items.
Copying a journal or returning to Napus Village can make items vanish under specific conditions.
The room is a little small, but attacks and items can be used as if you're inside a dungeon,
and if you linger long enough, a strong wind will begin to blow.
Enemy monsters can be made to appear by throwing a Surprise Pot (containing monsters),
and you'll lose all items and Gitan you're carrying if you collapse inside the storage.
Scrolls that stick to the ground like Sanctuary Scroll can be picked up again by re-entering.
An equipment gallery is available, where you can display weapons and shields you've obtained.
Keep in mind that once an item is put on display, you can't take it down from the wall.
Nothing special occurs if you complete the gallery, so it's just for collection and personal enjoyment.
Blacksmith
The Blacksmith is located at Shuten Halfway, and provides a few services.
Blacksmith Services
| Service | Price | Info |
|---|---|---|
| Hone Weapon | 1500 | Strengthen a weapon. (Upgrade value +1, or +3 on rare occasions) Can only be done once per adventure. |
| Erase Seal | 1000 | Erase a synthesis seal of your choice from a piece of equipment. |
| Repair Bracelet | 500 | Repair a cracked bracelet. |
Notes:
- It's also possible to strengthen weapons by reading a Heaven Scroll or using synthesis.
- Kaburasutegi and Fiery Fuuma require honing the weapon for the final step.
- It's possible to repair cracked bracelets by reading a Plating Scroll.
- [Erase Seal] lets you select a specific seal to erase, which cannot be done anywhere else.
- Monsoon Doll or Gyandora's special attack erases a random seal.
- He can strengthen non-metal weapons like Clubs too.
Trader Shops
Purchase and sell items at Trader Shops located at Shuten Halfway and Shuten Summit.
Shuten Halfway
| Item | Price |
|---|---|
| Nagamaki | 700 |
| Katana | 900 |
| Tribal Shield | 1500 |
| Beetle Shield | 7000 |
| Huge Onigiri | 300 |
| Otogiriso | 500 |
| Antidote Grass | 400 |
| Identify Scroll | 500 |
| Purify Scroll | 1000 |
| Storage Pot [5] | 1500 |
Shuten Summit
| Item | Price |
|---|---|
| Good Soil | 15000 |
| Good Water | 15000 |
| Good Wood | 15000 |
| Good Rock | 15000 |
| Good Iron Sand | 15000 |
Bank
Lets you deposit and withdraw any amount of Gitan for free.
Gitan saved in your account will not be lost if you collapse inside a dungeon.
The bank can only be accessed at Shuten Summit in the beginning,
but can be accessed from Napus Village after completing the castle.
Training Hall
Located in Napus Village near the entrance to the Shrine.
Defeat Oni Dolls to earn experience points and level up before entering a dungeon.
Save Data
Shiren's save data is stored either on cartridge or optionally in Controller Paks.
The game auto-saves progress to the cartridge as you play.
Creating a Journal
A new journal (save file) must be created when you first play the game.
Once a journal has been created, you can resume by selecting [Continue] at the main menu.
Up to 2 journals can be saved on the cartridge.
The game will auto-save progress every turn while playing the game.
The intention for doing so is to prevent save scumming, and to allow for recollection playback.
It's possible to copy a journal prior to entering a dungeon if you're extra worried about losing items.
However, the game truly is meant to be played without backups or save states, since learning
from your mistakes is one of the key components of a roguelike.
Scores (Leaderboards) are stored separately from journals, and can never be erased.
Keep that in mind if you consider using cheats, since your save data will have a record of it forever.
Copy a Journal / Return to Napus Village
Resuming a copied journal will start the adventure from Napus Village,
and all inventory items and Gitan will be lost, including Asuka and Mamo's items.
Going forward, you'll be able to resume gameplay like normal by selecting the [Continue] option.
Items deposited or withdrawn from storage prior to copying the journal will be lost in the copy
if you suspended the game inside Napus Storage after depositing or withdrawing items.
(In other words, the game reverts you to the point prior to entering Napus Storage)
This also occurs when you select [Return to Napus Village] from the main menu.
Shiren 2 is somewhat known for randomly deleting save data, so it's best to make backups.
Backups can be made using the 2nd journal slot, or by copying the journal to a Controller Pak.
Generally if save data deletion occurs, only the journal you were playing will be affected.
※ Save state usage can cause issues due to the way the game constantly writes.
Checking if a Journal is a Copy
Note the change in character following the file number (: vs .)
- Original = "1: Wanderer (player name)"
- Copied = "1. Wanderer (player name)"
Controller Pak
Up to 3 journals can be saved to a Controller Pak.
Controller Pak journals must be copied to the cartrige before they can be resumed.
Save Data Loss
Shiren 2's save data can be lost if the battery inside the cartridge runs out.
These batteries generally last 15~20 years, and as of 2021 the game is 21 years old.
How to replace the battery without losing save data:
- Copy the journals to a Controller Pak.
- Replace the cartridge battery.
- Copy the journals back to the cartridge.
